VoiceThread: Instructor Set Up and Grading Guide
TLC Guide
About VoiceThread:
- What is VoiceThread?
- Who can use VoiceThread?
- Why use VoiceThread?
- VoiceThread Integration to Canvas?
- How do I get started?
Steps for Getting Started
- Add a VoiceThread link to your course
- Configure Your Activity
- Wait for students to submit
- Grade student submissions
VoiceThread Resources
About VoiceThread
What is VoiceThread?
VoiceThread is an interactive collaboration and sharing tool that can be used to enhance student engagement and learning. With VoiceThread, instructors and students can create online slide show presentations with images, documents, videos, and other media files. These presentations can be narrated with either audio or video. Once created, the VoiceThread can be shared and students and instructors can asynchronously comment on individual slides using one of five tools for commenting: audio, video, text, phone, and audio file.
See this video to learn more about VoiceThread.
See this video to learn more about how VoiceThread can be utilized in your online class!
VoiceThread offers three assignment types that can be used to assess a variety of learning objectives. For example, instructors can create commenting activities whereby students discuss a topic or practice speaking (e.g. public speaking, language practice). Instructors can also create VoiceThread assignments where students create their own VoiceThreads to demonstrate, present, or debate a topic.
Create: Upload, share and discuss documents, presentations, images, audio files and videos. Over 50 different types of media can be used in a VoiceThread.
Comment: Comment on VoiceThread slides using one of five powerful commenting options: microphone, webcam, text, phone, and audio-file upload.
Share: Keep a VoiceThread private, share it with specific people, or open it up to the entire world. Learn more about sharing VoiceThreads.
Features:
- Flexibility: Tool can be used across multiple disciplines for a wide range of purposes
- Differentiated Assignments: Three assignment types available to faculty: create, comment, view.
- Cloud Application: Since VoiceThread is in the cloud, it can be accessed and used on a computer, laptop, or tablet.
- Mobile: With VoiceThread Mobile, users can access VoiceThread content on an iOS or Android mobile device.
- Media Types: Numerous types of media (e.g. images, video, audio, documents) can be used in a VoiceThread presentation
- Universal Design for Learning: VoiceThread supports a Universal Design for Learning construct by providing users 5 methods of commenting (e.g. audio, video, text, and phone).
Considerations:
- Group presentations: This tool can be cumbersome to use for group presentations
- Grading with percentages: Within VoiceThread, grades have to be entered in as percentages not point values
Who can use VoiceThread?
VoiceThread is FREE for ASU instructors and students through our enterprise license. Be advised that the Provost’s Office may choose to end license renewal upon annual contract review.
Why use VoiceThread?
VoiceThread integrates with Canvas and instructors utilize it instead of Canvas Discussion or Flip because of its capacity to build community and foster collaboration among students. Compared to traditional Canvas discussions, students typically find VoiceThread more engaging and intuitive because of its similarity to popular social media platforms.
VoiceThread Integration to Canvas?
VoiceThread seamlessly integrates into a variety of LMS systems, including Canvas, to ensure ease of communication between the course and the VoiceThread platform.
- Single Sign-On: All users access VoiceThread with a single click. VoiceThread will know the context of the user from Canvas and an account will be created for that person. Students and instructors are enrolled in their course community automatically as soon as they initiate account creation by loading VoiceThread through the link in their Canvas shell.
- Gradebook Integration: Set graded assignments in VoiceThread. Require students to create their own VoiceThreads, comment on one of yours, or simply watch a lecture and receive a grade. Assignments are graded in VoiceThread, and grades are sent back to your Canvas gradebook seamlessly.
How do I get started?
Follow the steps in this guide below to set up VoiceThread in your course. You can also find best practices for using VoiceThread at the end of this guide!
Steps for Getting Started
1. Add a VoiceThread link to your course
The first step to using VoiceThread in your course is to link VoiceThread to your course shell. There are various ways to set up VoiceThread so we encourage you to discuss the best way to set up VoiceThread with your Instructional Designer.
Setting up non-graded activities
- Navigate to the “Modules” area of your course.
- Find the module to which you’d like to add VoiceThread, and click the “Add Content” button.
- Select “External Tool” from the menu.
- Select VoiceThread ASUO/EdPlus or VoiceThread CLAS from the list of tools.
- Give your link a title if you’d like.
- Save.
- Click on the “load page in new window” button to access VoiceThread.
Setting up graded activities
- Navigate to the Assignments area of your course.
- Create a new assignment.
- Name the assignment and write a description if you choose.
- Select External Tool under Submission Type.
- Click on the Find button.
- Select VoiceThread ASUO/EdPlus or VoiceThread CLAS from the list.
- Save.
- Click on the “load page in new window” button to access VoiceThread.
You will then be prompted to verify your account or register for a VT account. If you need to register for an account, you can do so using your [email protected] email address, logging in to either CLAS or ASUOnline/EdPlus as your institution affiliation depending on your class subaccount.
2. Configure Your Activity
After you have added VoiceThread to your course, you’ll need to decide what you want students to see when they click on that link.

Non-graded Activities
- Individual VT
- Display any VoiceThread that you have created. When students click on the link, they’ll see just this one VoiceThread. This option is the best way to create a VoiceThread discussion board or lecture. Students will not need to look through a collection of VoiceThreads to find the correct one; they will be taken straight to it.
- Course View
- Display the collection of VoiceThreads that have been shared with your course. Anything that has not yet been explicitly shared with your course will not appear here. This is a good option when you want students to find and comment on each other’s work or if you want to allow students to review all course materials prior to an exam.
- VT Home
- Display all of a student’s VoiceThread content in a single view. This includes all VoiceThreads and all courses that belong to them. This option is useful if you want to create a simple portal into VoiceThread without directing students to any specific content.
Graded Activitites
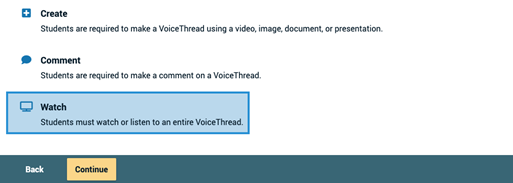
Through the Assignment Builder, you create a graded assignment requiring students to do one of three things:
- Create a VoiceThread
- Comment on a VoiceThread
- Watch a VoiceThread

Create Assignment
In the Create assignment, each student creates their own VoiceThread by uploading slides and recording comments. You can even allow students to see their classmates’ submissions later so they can engage in peer review and conversation.
This assignment type tends to be great for:
- Student presentations
- Demonstration of a skill
- Submitting a paper or video to receive feedback.
Watch this video or follow the steps below for detailed information on how to setup a Create assignment within VoiceThread
Step 1. Select “Create” as your activity
Click on the Create button, then click “Continue” at the bottom of the screen.

Step 2: Choose options
Select the playback settings you want each student’s VoiceThread to have. Students will not be able to override these settings. Click “Continue” at the bottom of the screen when you’re done.
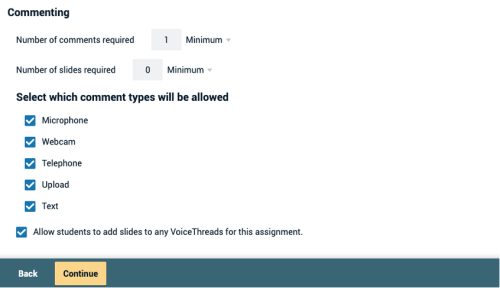
Settings include:
- Number of comments required
- Students will be required to post comments on the VoiceThread they create. You can require a minimum number or an exact number. They will not be permitted to submit until this requirement is met.
- Commenting types
- Select which types of comments you want to allow students to post.
- Allow students to add slides to any VoiceThreads for this assignment
- Allow students to add slides to any VoiceThreads submitted by their classmates to this assignment.
- Enable threaded commenting
- Turns on the ability for your participants to start threaded conversations.
- Enable comment moderation
- Allows you and the student to preview all comments on this VoiceThread before revealing them to others. You can also choose never to reveal them. Learn more about Comment Moderation.
- Don’t allow commenters to delete their own comments
- Anyone who records a comment on a VoiceThread will be unable to delete it once it is saved. This is a powerful tool for assessment because your commenters will not be able to “retry” after they’ve recorded.
- Limit length of each comment
- By default, all audio and video comments recorded in VoiceThread can be 60 minutes long. If you’d like to set shorter time limits for your commenters, enter your desired maximum comment length here.
- When recording, automatically advance to the next slide after
- Set slides to advance automatically at pre-set intervals as users are recording. Learn more about timed presentations here.
- Start playing when opened
- The comments on your VoiceThread will begin playing automatically when people first open it.
- When final comment on a slide has played, automatically advance to the next slide after __ seconds
- When the VoiceThread is in play mode, it will play through all of the comments on a slide and then move to the next slide automatically. The number of seconds is the “pause” time before the slide advances.
- Allow download
- Allow students to download the central media from the VoiceThreads their classmates create.
- Allow export
- Allow students to export one another’s VoiceThreads.
- Allow students to make a copy
- Allow students to make a copy of one another’s VoiceThreads.
- Student Gallery
- If you want students to view one another’s VoiceThreads after they are submitted, check this box. This will give them a “Student Gallery” button in their interface to see the VoiceThreads their classmates have submitted for this assignment.
Step 3: Finalize
Set the final details for your assignment. Click “Publish” at the bottom of the screen when you’re done.

- Assignment name
- This will appear at the top of the assignment in the student’s view.
- Assignment instructions
- These instructions will appear on the right-hand side of the student’s view. Tell them more about what you expect from them here.
- Example URL
- If you have created an example you want students to follow or more information about the assignment, enter the link to that page here. It will appear on the right side of the student’s view.
- Message shown to student after they submit
- Customize the message students see after they’ve submitted their VoiceThread. A little personalization goes a long way!
- Start date
- Students will not be able to view the assignment until the start date/time. If you want it to be open immediately, leave this blank.
- Due date
- Students will not be able to submit after this date. If you want the assignment to be open indefinitely, leave this blank.
- Allow students to resubmit assignment
- Give students the opportunity to try again if they submit the wrong thing or need to make corrections after you give them feedback.
- Allow students to view assignment after submitting
- If you don’t want students to be able to see the work they’ve submitted, un-check this box. If you want them to see their work so you can record feedback on it, leave it checked. They will not be able to make any changes to their work even if they can see it.
- Assessment
- Choose how you would like to grade this assignment.
Comment Assignment
In the Comment assignment, students post comments on a VoiceThread that you have created. You can decide whether or not students can see one another’s comments. This assignment is great for:
- Graded discussions
- Quizzes
- Speaking practice (public speaking, language practice, poetry out loud)
Watch this video or follow the steps below for detailed information on how to setup a Comment assignment within VoiceThread.
Step 1: Choose Activity
Click on the Comment button, then click “Continue” at the bottom of the screen.

Step 2: Choose content
Select which VoiceThread you want to use for this assignment. Students will be recording their comments here.
- To create a new VoiceThread, select the “create a new VoiceThread” option in the top-right corner. This will take you to the create page, where you can upload new slides and click “Continue” at the bottom of the page to open the VoiceThread and record comments.
- To use an existing VoiceThread, select from any of the ones you have created or that you can edit, and then click “Continue” at the bottom of the screen. This will take you to the page where you can make any edits necessary. Once you choose the VoiceThread you want to use, a copy of that VoiceThread will be made to use in this assignment. You will continue to own the clean original.
Step 3: Choose options
Select the playback settings you want your VoiceThread to have. Click “Continue” at the bottom of the screen when you’re done.
- Number of comments required
- Students will be required to post comments on your VoiceThread. You can require a minimum number or an exact number. They will not be permitted to submit until this requirement is met.
- Commenting types
- Select which types of comments you want to allow students to post.
- Allow students to add slides to any VoiceThreads for this assignment
- Allow students to add slides to the VoiceThread you’ve set up for this assignment.
- Enable threaded commenting
- Turns on the ability for your participants to start threaded conversations.
- Enable comment moderation
- Allows you to preview all comments on this VoiceThread before revealing them to your students. You can also choose never to reveal them. Learn more about Comment Moderation.
- Don’t allow commenters to delete their own comments
- Anyone who records a comment on this VoiceThread will be unable to delete it once it is saved. This is a powerful tool for assessment because your commenters will not be able to “retry” after they’ve recorded.
- Limit length of each comment
- By default, all audio and video comments recorded in VoiceThread can be 60 minutes long. If you’d like to set shorter time limits for your commenters, enter your desired maximum comment length here.
- When recording, automatically advance to the next slide after
- Set slides to advance automatically at pre-set intervals as users are recording. Learn more about timed presentations here.
- Start playing when opened
- The comments on your VoiceThread will begin playing automatically when people first open it.
- When final comment on a slide has played, automatically advance to the next slide after __ seconds
- When the VoiceThread is in play mode, it will play through all of the comments on a slide and then move to the next slide automatically. The number of seconds is the “pause” time before the slide advances.
- Allow download
- Allow students to download the central media from your VoiceThread.
- Allow export
- Allow students to export Your VoiceThread.
- Allow students to make a copy
- Allow students to make a copy of your VoiceThread.
Step 4: Finalize
Set the final details for your assignment. Click “Publish” at the bottom of the screen when you’re done.
- Assignment name
- This will appear at the top of the assignment in the student’s view.
- Assignment instructions
- These instructions will appear on the right-hand side of the student’s view. Tell them more about what you expect from them here.
- Example URL
- If you have created an example you want students to follow or more information about the assignment, enter the link to that page here. It will appear on the right side of the student’s view
- Message shown to student after they submit
- Customize the message students see after they’ve submitted their VoiceThread. A little personalization goes a long way!
- Start date
- Students will not be able to view the assignment until the start date/time. If you want it to be open immediately, leave this blank.
- Due date
- Students will not be able to submit after this date. If you want the assignment to be open indefinitely, leave this blank.
- Allow students to resubmit assignment
- Give students the opportunity to try again if they submit the wrong thing or need to make corrections after you give them feedback.
- Allow students to view assignment after submitting
- If you don’t want students to be able to see the work they’ve submitted, un-check this box. If you want them to see their work so you can record feedback on it, leave it checked. They will not be able to make any changes to their work even if they can see it.
- Assessment
- Choose how you would like to grade this assignment.

Watch Assignment
In the Watch assignment, students are required to watch a VoiceThread. This assignment type is great for:
- Non-interactive lecture delivery
- Compliance and training (i.e. lab training)
Watch this video or follow the instructions below for detailed information on how to setup a Watch assignment within VoiceThread.
Step 1: Choose Activity
Click on the Watch button, then click “Continue” at the bottom of the screen.
Step 2: Choose content
Select which VoiceThread you want to use for this assignment. Students will be required to watch 100% of all slides and comments.
- To create a new VoiceThread, select the “create a new VoiceThread” option in the top-right corner. This will take you to the create page, where you can upload new slides and click “Continue” at the bottom of the page to open the VoiceThread and record comments.
- To use an existing VoiceThread, select from any of the ones you have created or that you can edit, and then click “Continue” at the bottom of the screen. This will take you to the page where you can make any edits necessary. Once you choose the VoiceThread you want to use, a copy of that VoiceThread will be made to use in this assignment. You will continue to own the clean original.
Step 3: Choose options
Select the playback settings you want your VoiceThread to have. Click “Continue” at the bottom of the screen when you’re done.
- Start playing when opened
- The comments on your VoiceThread will begin playing automatically when people first open it.
- When final comment on a slide has played, automatically advance to the next slide after __ seconds
- When the VoiceThread is in play mode, it will play through all of the comments on a slide and then move to the next slide automatically. The number of seconds is the “pause” time before the slide advances.
- Allow download
- Allow students to download the central media from your VoiceThread.
- Allow export
- Allow students to export Your VoiceThread.
- Allow students to make a copy
- Allow students to make a copy of your VoiceThread.
Step 4: Finalize
Set the final details for your assignment. Click “Publish” at the bottom of the screen when you’re done.
- Assignment name
- This will appear at the top of the assignment in the student’s view.
- Assignment instructions
- These instructions will appear on the right-hand side of the student’s view. Tell them more about what you expect from them here.
- Example URL
- If you have created an example you want students to follow or more information about the assignment, enter the link to that page here. It will appear on the right side of the student’s view
- Message shown to student after they submit
- Customize the message students see after they’ve submitted their VoiceThread. A little personalization goes a long way!
- Start date
- Students will not be able to view the assignment until the start date/time. If you want it to be open immediately, leave this blank.
- Due date
- Students will not be able to submit after this date. If you want the assignment to be open indefinitely, leave this blank.
- Allow students to resubmit assignment
- Give students the opportunity to try again if they submit the wrong thing or need to make corrections after you give them feedback.
- Allow students to view assignment after submitting
- If you don’t want students to be able to see the work they’ve submitted, un-check this box. If you want them to see their work so you can record feedback on it, leave it checked. They will not be able to make any changes to their work even if they can see it.
- Assessment
- Choose how you would like to grade this assignment

3. Wait for students to submit
When students go to your assignment, they will see the interface to complete the required work and submit. For details, visit the assignment guide for students.
4.Grade student submissions
To grade your students’ submissions, just return to the assignment you have set up in VoiceThread. You will see the grading interface automatically. When you click on the VoiceThread assignment, you will be able to see which students have completed the assignment on the right. Click on a student’s name to see that student’s submission. Note: If it is a commenting assignment, you can click on each comment below the student’s name to jump directly to it.
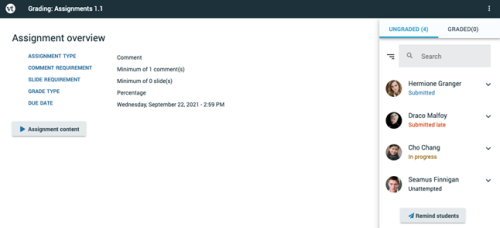
On the right side of the page, you will see your course roster. If a student is missing from the roster, it means that the student has not clicked into your assignment at all yet, but they will appear as soon as they do. Students can fall into three categories:
- Submitted: Students who have submitted their final assignment
- In progress: Students who have started working on the assignment but have not yet submitted
- Unattempted: Students who have not yet begun working on the assignment at all
You can enter grades for students who are listed as “Submitted” or “In progress.” Click on a student’s name to see their submission, then enter the grade into the text box or pass/fail selector on the right and press Enter on your keyboard.
Enter a grade on a percentage scale (0-100), and hit Enter on your keyboard. This grade will immediately be passed back into your Canvas course gradebook. Please note that if you have set the assignment to be worth less than 100 points, still grade it on a scale of 0-100, and the score will be adjusted accordingly in your gradebook.
Watch this video for detailed instructions on grading assignments in VoiceThread.
Additional features:
- Reminders: To remind a student to submit, click on the student’s name, and then click on the “Remind” button. You can also click “Remind Students” at the bottom of the list to remind all students who have not yet submitted.
- Un-submitting: If a student has submitted an assignment but needs to try again, click on the student’s name, click on “Additional options” beneath the grading area, then click “Unsubmit.”
- Changing grades: To see students who have already been graded, click on the “Graded” tab in the top-right corner, and then click on any student in that list to enter a new grade for them.
- Student gallery: If you have created a “Create a VoiceThread” assignment and enabled the student gallery, you will see the student gallery button on the main landing page (Assignment Details area).
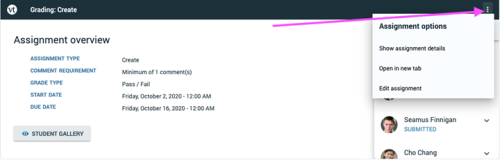
- Edit the assignment: If you need to make changes to how this assignment is configured, click on the menu icon top-right and select “Edit assignment”.
**Note: Editing an assignment that is in progress may make existing student work inaccessible. It is best not to edit an assignment that is already being used, but if you must, keep in mind that selecting a different VoiceThread or even re-selecting the same one can cause student work not to be counted.